
GC Home | Register | Shop | Learn | Business | Around Town | Info
by Charlotte Wolfe -- Charlotte's Sew Natural
I call these "fuzzies", but they are also more commonly known as "chenille strips".
This technique involves cutting fabric on the bias, 45° across the lengthwise and crosswise woven grains of the fabric.
The cut edges, left raw, will get "fuzzy" when washed and dried. They will not ravel or get raggy, just fuzzy. You do not risk clogging your washing machine or your drains with this technique. You do not have to do any clipping or snipping to achieve this fuzzy look. You just need to wash and dry the project, with some agitation. Or you can just get it wet and rough it up with a soft brush, raising up the fibers on the raw, bias cut edges.
At first, you should always test your fabrics before jumping into the project. After a while, you will begin to get a "feel" for what fabrics will work better than others, but I still cut and sew test strips. This involves cutting a couple of 5/8" wide bias strips off the corners of my fabrics, layering 3, sewing them together and to a foundation, getting them wet, brushing them up, letting them dry. I always sew a couple of different combinations. If they just lay there or simply fold over and look flat, I look for different fabrics or other combinations.
Fuzzies are best made using cotton, rayon, linen fabrics, or a blend of any of these fibers. The technique works best when the fabric is not printed, but only woven, such as a plaid or stripe. However, using printed fabric in combination with non-printed, produces satisfactory results. Heavier decorator-type cotton fabrics, such as Bark Cloth, even when printed, work great, as does Monk's Cloth. Any fabric with lots of "yarn" in the weave that will let loose when washed will usually result in an excellent fuzzy edge.
Flannels and brushed cottons make very wonderful fuzzies, but one should pay attention to the brushed side. We have found that if only one side is brushed, that side should be face down when applied to the project. This usually means that the brushed sides will be facing up when you are marking and stitching the fuzzies.
 |
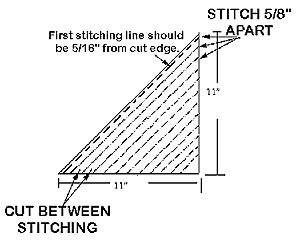
We highly recommend using the 5/16" Chenille Grid Stencil for this technique. If you are using this stencil grid, you will want the short legs of the triangle to measure 11" each. The long side will measure approx. 15". |
Instructions:
Cut a right triangle, where the two short legs of the triangle are on the lengthwise and crosswise grains and are of equal length. The long side opposite the 90° corner is a bias cut edge. Cut triangles in multiples of 3 (i.e. 3, 6, 9, 12 etc.)
Stack 3 triangles, brushed side up if there are any brushed fabrics (see above).
Mark stitching line 5/8" apart, starting 5/16" from the long bias edge. (See illustration below.)
Stitch on these lines, through all 3 layers.
Cut half-way between the stitched lines, through all 3 layers. Your "fuzzies" will be flat and measure 5/8" wide by varying lengths.
The "fuzzies-to-be" can now be stitched to any foundation through the stitching line which is running down the center of the 3-layer strip. When you need more length, just overlap approx. 1/2" and continue stitching down the center of the fuzzies. If your stitching line was drawn with permanent ink, or if one side of the fabric is brushed, place that next to the foundation when stitching.
When the fuzzies are all attached, you must wash and dry them, either by machine or by hand (see above) to raise the fibers and actually make them nice and FUZZY!
You will love these so much we can't imagine only wanting "chenille by the inch". You will need many, many feet! So have fun making "Fuzzies By The Foot"!
See my patterns which all use "fuzzies" as embellishment of some sort. These are sure to inspire and start you thinking of all the places you would like to have FUZZIES!
More information on Charlotte's Sew Natural
Back to the Get Creative! Conference Center
Back to Meet the Get Creative! Experts
|
GetCreativeShow.com
| [email protected]
www.GetCreativeShow.com
Advertisers & Virtual Advantage Web Design Clients |
||
|
SEWING
& QUILTING: A Stitch in Time Quilting Abby's Attic Quilting & Fabric Blossom Quiltworks Buggy Barn Quilts Carriage Country Quilts Charlotte's Sew Natural Cozy Kitten Quilts Deborah Gayle Sales Flamingo Island Designs LLC Fat Quarter Quilters Front Porch Quilts GreatPond Quilts LLC Grandmas Attic Quilting Judy's Barlup's Unique Techniques Karen's Kreations Let's Quilt Liberty Quilt Shop Londa's Sewing LS Boudreau Quilt Fabric Store Mendon Village Muggin's Designer Hats My
Quilt Shoppe
|
SEWING
& QUILTING: Quilting Search Quiltmakers Quilt Shop Quilts by the Bay SAF-T-POCKETS Sewing Gallery Sew Bee It Sew Many Options Tours Silhouette Patterns Stacey's Quilty Conscience Sundrop Textiles Sunflower Quilts Suzanne's Quilt Shop Texas Quiltworks The Quilting Circle The Quilted Crow Tiny Stitches Weather or Not Fabrics VA Quilt Shops Virtual Advantage Quilt Shop Resource VonZensenburg Quilts York Street Quilting Co. CRAFTS
& NEEDLEWORK: |
OTHER
VA CLIENTS: BC Holstein News Cedarland Forest Products Clearbrook Brewing Davit Systems Demo GoldenSilencer.com Silencer Products Int. Heat Safe Industries Kodiak Ranch Lake Tahoe House Rental BC Fishing Resorts BC Fishing Directory BC Fishing Derby Resource BC Sport Fish, BC Sport Fishing Salmon Sports BC Fishing BajaSportFishing Cabo Sportfishing Tide Exchange Beachcombers Marina Kaslo Bay Resort & Condo Dev Mary's Gunns Riverside Golf Highland Powder Skiing Blackfish Marine Blackfish Desert Race Baja 1000 Fairview Electrolysis RealEstateBuySell Silva Panel S'more Camping Please Lighting Store.ca Coast Spas
|