GC Home | Register | Shop | Learn | Business | Around Town | Info
Elastic Waist Inserts
by Kathy Ruddy, Unique Patterns Design
Limited
Elastic Waist Inserts can be added
to Any Pants Pattern.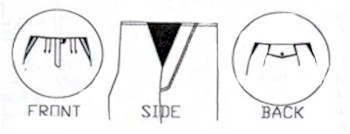
For the elastic described in this lesson please contact Kathy Ruddy at
[email protected]
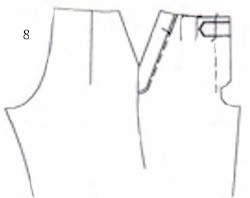
Tab Front Closing
Because this style finishes at the
waist with no waistband, a tab is needed to hold the slack closed at the top of
the zipper opening. 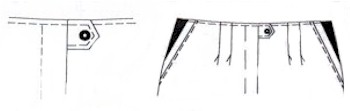
Partial Elastic Waistlines
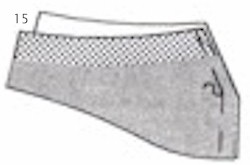
Traditional tailored slacks are classics that work well in a timeless wardrobe. however, they are often uncomfortable at the waistline. In Marseilles, France, I saw this pair of slacks on a Frenchman shopping at a waterfront market. The pants were fully tailored with an elastic insertion at side seams to give a smooth look that still allows for fluctuations in waistline. To look good and feel good, use these techniques to convert a traditional slack pattern unto slacks with a faced waistline and elastic inserts at the side seam.

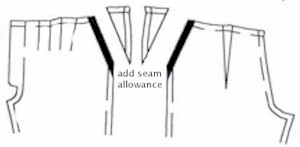
Pattern Changes
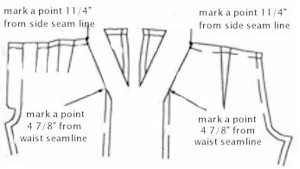
1) Only use a tested pattern that already fits. Make a copy of your pattern. Use it to create new pattern pieces for facings and pant front and back with new cut and stitch lines at side seams. On the front and back at the side seams, mark a point 4 7/8" below the waist seam line. On the front and back at the waist seam, mark a point 1 1/4" from the side seam line. Draw a line between these two points. Add seam allowance. Trim away on the new cut line. This area removed will be replaced with elastic insets.
 |
 |
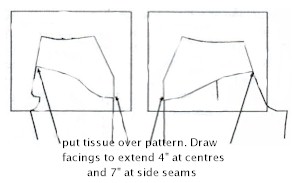
2) Create front and back facings. Fold all waist pleats and darts to final size. Place see-thru pattern paper or tissue paper over the front and back pants patterns pieces and trace a facing to extend 4" down centers and 7" down side seams. Use a curved ruler to join these points. Transfer the grain arrow onto the new front and back facing patterns.
 |
 |
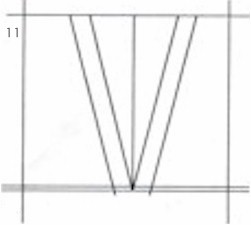
3) Create a front tab.
Draw three parallel lines 5/8" apart. Cross these lines with three
right angle lines at 0", 2 3/4" and 3 1/2". Draw diagonal
lines from intersections of the last two cross lines to form an arrow. Add
seam allowance
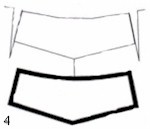
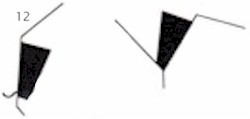
4) Create a flap detail for pants back. Place tissue over back pattern piece. Trace the waist seam-line across the top to a point 2 5/8" below the waist seam-line on the dart seam-line closest to center back and 4 5/8" below the waist seam-line at center back. Add seam allowances.
Construction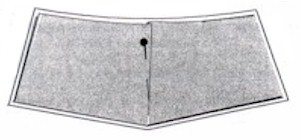
5) Interface the following pieces: Waist facings, front tab, back flap, and fly extension. Stitch the flap and tab. To keep the under flap and tab from sticking out at the sides, the upper flap needs to be wider. To accomplish this, on the upper flap and tab, vertically pin a 1/8" tuck down the middle of the open end, stopping before the stitch-line at the bottom of the flap. Next, with right sides together, stitch the tab and flap. Press, trim, turn, press and topstitch the flap and tab. Release the pinned tuck and the upper flap allowing it to wrap around the seam-line keeping the under flap from sticking out at the sides.
6) Stitch tucks and press them facing towards the side seam. Stitch back darts.
7) Add side pockets. To keep the pocket from gapping at the waistline, topstitch the pocket shut for 2" below the waist seam-line.
6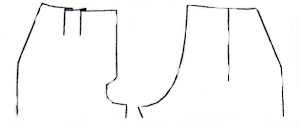 |
7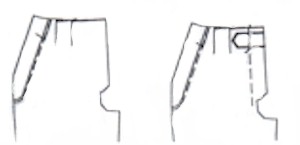 |
8) For a woman's fly, on right front, pin tab to right side of fly extension at center front starting at the waist seam-line. Stitch tab to fly extension at center front.
9) Stitch fly zipper. Do not top stitch the zipper fly now. You must wait until after the facing is attached.
10) At side seams, stitch fronts to backs to the point 4 7/8" below waist seam-line. Press seam open.
11) Make an elastic insert. Using 5" wide knitted elastic, draw a line across the elastic and right angle to the finished edge. This will be the center of the elastic insert. On one finished edge, mark a point 1 1/4" to each side of the center line. On the center line, mark a point 1/8" above the other finished edge. Join these points and add seam allowances.
|
|
|
12) With right sides together, pin and stitch the elastic insert to the pant front back at the side seams from the waist seam line to the point 4 7/8" below.
13) With right sides together, stitch center back.
|
|
|
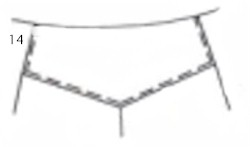
14) With right sides up, pin the back flap to center back.
15) With right sides together, stitch front facing to back facing at side seams from insert dot to bottom edge and at center back. Press seams open.
|
|
|
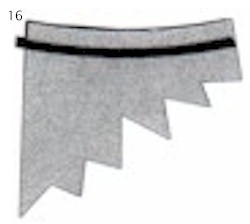 16) Stabilize the waist seam
with a product manufactured in Japan called fusible straight tape. Press it to
the wrong side of the facing with the top edge of the tape placed just below the
waist seam line. This way it will not create bulk in the waist seam line
but will get caught in the top stitch.
16) Stabilize the waist seam
with a product manufactured in Japan called fusible straight tape. Press it to
the wrong side of the facing with the top edge of the tape placed just below the
waist seam line. This way it will not create bulk in the waist seam line
but will get caught in the top stitch.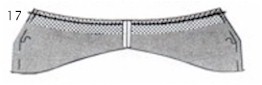
17) With right sides together,
pin and stitch the facing to the pant back on the waist seam line and down the
side of the elastic insert.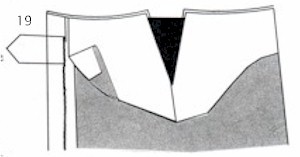
18) Stitching the facing to the waist on the overlapping side of the zipper is a little dicey. With the right side of the facing up, fold facing under 1/4" away from the zipper teeth. Mark this stitch line facing and fly extension. With right sides together, stitch the facing, the fly extension on this line. Trim away excess seam allowance. With right sides together, stitch the facing to the pant front across the top and down the side of the elastic extension. Press the seam open then turn and press it. Topstitch the overlapping side of the fly zipper. Repeat on the other side of the pant front.
19) Top stitch around the top of the pant 1/4" from the edge. To finish the tab, add a buttonhole.
For the elastic described in this lesson please contact Kathy Ruddy at [email protected]
More Information on Unique Patterns
Back to the Get Creative! Conference Center
Back to Meet the Get Creative! Experts
|
GetCreativeShow.com
| [email protected]
www.GetCreativeShow.com
Advertisers & Virtual Advantage Web Design Clients |
||
|
SEWING
& QUILTING: A Stitch in Time Quilting Abby's Attic Quilting & Fabric Blossom Quiltworks Buggy Barn Quilts Carriage Country Quilts Charlotte's Sew Natural Cozy Kitten Quilts Deborah Gayle Sales Flamingo Island Designs LLC Fat Quarter Quilters Front Porch Quilts GreatPond Quilts LLC Grandmas Attic Quilting Judy's Barlup's Unique Techniques Karen's Kreations Let's Quilt Liberty Quilt Shop Londa's Sewing LS Boudreau Quilt Fabric Store Mendon Village Muggin's Designer Hats My Quilt Shoppe Newport Quilt & Gift Company Norton House - A Quilters Paradise Oakes & Acorns Patchwork Sampler Quilting Supplies Playtime Quilts Professional Assn of Custom Clothiers Quiltropolis Quiltshopimage Quilters Paradise Quilters Mercantile Quilters Quarters |
SEWING
& QUILTING: Quilting Search Quiltmakers Quilt Shop Quilts by the Bay SAF-T-POCKETS Sewing Gallery Sew Bee It Sew Many Options Tours Silhouette Patterns Stacey's Quilty Conscience Sundrop Textiles Sunflower Quilts Suzanne's Quilt Shop The Country Spool Texas Quiltworks The Quilting Circle The Quilted Crow Tiny Stitches Weather or Not Fabrics VA Quilt Shops Virtual Advantage Quilt Shop Resource VonZensenburg Quilts York Street Quilting Co. CRAFTS
& NEEDLEWORK: |
OTHER
VA CLIENTS: BCsportfish.com BCtroutfishing.com BC Holstein News Cedarland Forest Products Clearbrook Brewing Davit Systems Demo GoldenSilencer.com Silencer Products Int. Heat Safe Industries Kodiak Ranch Lake Tahoe House Rental Salmon Sports BC Fishing BajaSportFishing Mary's Gunns Riverside Golf Reopboats.ca Highland Powder Skiing Fairview Electrolysis RealEstateBuySell Silva Panel S'more Camping Please Lighting Store.ca Coast Spas
|