
GC Home | Register | Shop | Learn | Business | Around Town | Info
This past Christmas I made matching 100%
cotton flannel pajamas for my children. When the project was finished, I had a
sizable pile of bonus pieces. The Flannel Fun vest utilized the bonus bits along
with other goodies from my stash. 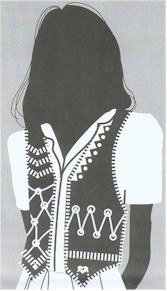
Materials Needed:
Your favorite center-front-closing vest pattern
11/2 yards of 100% cotton, plaid flannel or a pile of flannel scraps
Denim or fabric of your choice for vest fronts and back
Fasturn for turning bias tubes or your favorite tube turning tool
Eleven 3/4" silver, gold, or red plastic rings. (decorative rings are widely available in the home dec. department of most fabric stores and are commonly used in drapery making.)
One heart shaped concho
One pair vest clips
Three heart shaped buttons for the yo-yo centers on the vest clip
Six 1/2" buttons
Making the Flannel Fun Vest:
Cut two vest fronts and one vest back.
With right sides together sew shoulder and side seams.
Cut 4 to 5 yards of 11/2" wide bias fabric to bind vest armholes and edges. Note: The exact yardage will depend upon your vest style and size.
Cut 23/4 yards of 2" wide
bias. This bias will be used to make the self-filled fabric tubes. 
Cut seven 4" fabric squares and make seven prairie points by folding 4" fabric squares as shown.
Fold the 2" wide bias fabric strips, right sides together and sew 5/8" from the folded edge. Use a Fasturn or another tube turning tool to turn the tubes right side out. Note: Don't trim the excess fabric before turning the tubes -- the extra fabric will "stuff" the tube giving it body and dimension.
Making the "Blooming" Flannel Sections:
Three sections of the vest are embellished
with five layers of flannel that has been cut, stitched, washed and dried to
"bloom" or texturize the fabric. Each section was pre-shaped, sewn,
cut, texturized and them sewn to the vest. The vest edges are bound after
applying the bloomed pieces. 
Cut five 21/2" wide bias strips, the width of the lower left edge of the vest plus 2". Sew across the 21/2" wide layered strip every 1/2" down the entire piece. Cut through 4 of the layers but do not cut through the bottom layer.
Cut five bias pieces to fit the vest right shoulder area and extend down from the shoulder about 6". Layer the shoulder pieces and mark the vertical center, Sew on the true bias toward the center mark, turn 45 degrees and continue sewing on the true bias, creating a chevron design. Sew additional rows every 1/2" until the entire shoulder piece has been quilted.
Cut through four layers of fabric but do not cut through the bottom layer. Measure up 3" from the lower right side of the vest and mark a guide line. Measure out from the guide line 21/2". You have now created a chevron shaped pattern to fit the lower right section of the vest.
Using the chevron shape as a pattern, cut five pieces of bias fabric. Layer the pieces and sew across the 21/2" wide layered strip every 1/2" down the entire piece. Cut through 4 of the layers but do not cut through the bottom layer.
Wash and dry all three layered pieces. Cut the shoulder section creating three 1" wide chevron pieces.
Secure all layered pieces to the vest front with hand stitches.
Finishing the Vest:
Secure prairie points, and rings to the vest left side.
Thread self-filled tube through the rings creating a design similar to that shown on the vest right front. The rings can hang loose or be secured to the fabric.
Bind the vest edges with bias fabric.
Making the Vest Clip: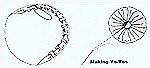
Make three yo-yos for the decorative vest clip by cutting three 4" circles. Hold the fabric circle with the wrong side facing you and turn under raw edges 1/4" with short running stitches, around each circle. Pull the thread to draw up the circle and create a yo-yo. Sew a heart button to the center of each yo-yo. Join the three yo-yo's together and attach to vest clips.
More information on Total Embellishments
Back to the Get Creative! Conference Center
Back to Meet the Get Creative! Experts
|
GetCreativeShow.com
| [email protected]
www.GetCreativeShow.com
Advertisers & Virtual Advantage Web Design Clients |
||
|
SEWING
& QUILTING: A Stitch in Time Quilting Abby's Attic Quilting & Fabric Blossom Quiltworks Buggy Barn Quilts Carriage Country Quilts Charlotte's Sew Natural Cozy Kitten Quilts Deborah Gayle Sales Flamingo Island Designs LLC Fat Quarter Quilters Front Porch Quilts GreatPond Quilts LLC Grandmas Attic Quilting Judy's Barlup's Unique Techniques Karen's Kreations Let's Quilt Liberty Quilt Shop Londa's Sewing LS Boudreau Quilt Fabric Store Mendon Village Muggin's Designer Hats My Quilt Shoppe Newport Quilt & Gift Company Norton House - A Quilters Paradise Oakes & Acorns Patchwork Sampler Quilting Supplies Playtime Quilts Professional Assn of Custom Clothiers Quiltropolis Quiltshopimage Quilters Paradise Quilters Mercantile Quilters Quarters |
SEWING
& QUILTING: Quilting Search Quiltmakers Quilt Shop Quilts by the Bay SAF-T-POCKETS Sewing Gallery Sew Bee It Sew Many Options Tours Silhouette Patterns Stacey's Quilty Conscience Sundrop Textiles Sunflower Quilts Suzanne's Quilt Shop The Country Spool Texas Quiltworks The Quilting Circle The Quilted Crow Tiny Stitches Weather or Not Fabrics VA Quilt Shops Virtual Advantage Quilt Shop Resource VonZensenburg Quilts York Street Quilting Co. CRAFTS
& NEEDLEWORK: |
OTHER
VA CLIENTS: BCsportfish.com BCtroutfishing.com BC Holstein News Cedarland Forest Products Clearbrook Brewing Davit Systems Demo GoldenSilencer.com Silencer Products Int. Heat Safe Industries Kodiak Ranch Lake Tahoe House Rental Salmon Sports BC Fishing BajaSportFishing Mary's Gunns Riverside Golf Reopboats.ca Highland Powder Skiing Fairview Electrolysis RealEstateBuySell Silva Panel S'more Camping Please Lighting Store.ca Coast Spas
|