
GC Home | Register | Shop | Learn | Business | Around Town | Info
This quilt goes together fast and makes a great baby gift. We made ours up in white and red but this quilt would look great in just about any colour! Finished Size 40" by 56"
Sewing Supplies: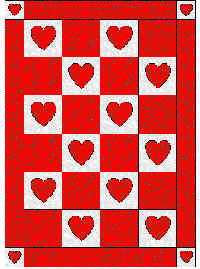
1.60 meter for main fabric and Hearts
0.70 meter of white
1-meter fusible web (We like to use Steam-A-Seam 2)
1 Crib size batting
1.60 meter backing (flannel works great)
Cutting Out:
Open up the main fabric and refold so the cut edges are together. You will be cutting your first strips on the lengthwise grain. These strips will be for the border of the quilt.
Cut four stripes 4 �" wide
Sub cut each strip the following:
Two strips measuring 4 �" by 48 �" long
Two strips measure 4 �" by 32 �" long
Set strips aside, now refold the fabric so you are cutting on the crosswise grain, selvage-to-selvage folded together. We will now cut the squares:
From the main fabric, cut six strips 8 �"
wide
Sub cut these six strips into 12 - 8 �" squares
Fusing the Hearts:
The remaining main fabric is for the fused hearts. Following the manufacturers directions for your fusible web. Trace the hearts onto the paper with the fusible web. You will need to trace 12 large hearts and four small hearts (the small hearts are used for the corner blocks). The heart templates are available on-line to print out. Iron the fusible web onto the back for the main fabric. Remember to hold your iron on the fusible web and fabric for approximately 10 seconds. Fusing longer than this can cause the fabric to become stiff. Repeat this process until you have fused 12 large hearts and 4 small ones. Cut out around the outside of the hearts on your pencil tracing lines.
Cutting Out White Blocks:
Next, from the white fabric, cut three strips
8 �" wide
Sub cut these strips into 8 �" squares
Sub cut the left over pieces again into 4 - 4 �" squares
Now, taking your Red Hearts, remove the paper backing and place each heart with the fusible web to the right side of one white square. You should have 12 large 8 �" squares for 12 large hearts and 4 smaller 4 �" squares for 4 smaller hearts. Fuse each heart onto the white fabric; remember not to leave the iron on the fabric for too long. To align, you can fuse the hearts straight onto the white squares or lean them to the right or left. You can also do a combination of both straight hearts and leaning hearts (see the images of the quilt on the web site).
Once the hearts are fused to the squares, finish the edges of the fused hearts with a method of your choice. We blanket-stitched around the outside of each heart in red thread. You could also do a satin stitch or straight stitch around the edge. If you want to get really adventurous, why not do an all over free motion stitch onto the heart.
Putting it Together:
Now that your hearts are fused in place, you
can start putting your quilt together. For the first row, stitch one solid red
square to one fused-heart square, remembering to use a �" seam. Press seam
allowance to the left hand side. Continue to add blocks to the row, alternating
between the solid and fused-heart blocks. For this row, remember to press
all your seams to the left side. When the first row is
completed your pattern should be:
Solid block - heart block - solid block - heart block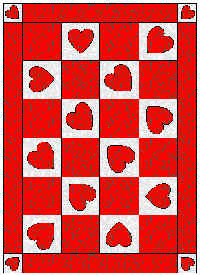
Row Two:
Heart block - solid block - heart block - solid block
This time press all your seam allowances to the right side
Row Three:
Solid block - heart block - solid block - heart block
Press seam allowances to left side
Row Four:
Heart block - solid block - heart block - solid block
Press seam allowance to right side
Row Five
Solid block - heart block - solid block - heart block
Press seam allowance to right side
Row Six (last one!)
Heart block - solid block - heart block - solid block
Press seam allowance to left side
Joining the blocks together:
Place Row Two on Row One right sides together. Your seam allowances on each row should be lying in opposite directions. Pin along the row, aligning the blocks at the seams. Stitch the two rows together using a �" seam. Press seam to one side.
Next, taking Row Three, lay right sides together onto Row Two, matching seams. Press seam to one side.
Continue adding rows to the quilt, pressing your seams to one side.
Adding borders:
Taking one 4 �" by 48 �" border, pin the border strip onto one of the long sides of the quilt and stitch using a �" seam. Press seam allowances towards the border. Add the second border strip to the second long side of the quilt. Pin the border strip in place and attach to quilt using a �" seam. Press seam towards the border.
Before attaching the top borders, you must add a small 4 �" fused-heart square to each end of the two 32 �" border strips. Attach one fused-heart block on one side, press seam allowance away from heart block, and then attach the second fused-heart block to the other side. Repeat with second border strip. Taking one border strip at a time, add the border to the top of the quilt. The corner block seam should line up with the border seam from the first borders that you just added. Pin the border in place and stitch using a �" seam. Repeat with fourth and final border.
Finishing Up:
Remove selvage from the backing. Cut the backing and batting approximately 4 inches larger than the finished quilt top. Baste backing, batting and quilt top together with a method of your choice (pin, hand basting or stray adhesives) Quilt by machine or by hand as desired. Add binding and enjoy!
More information on The Secret Workshop
Back to the Get Creative! Conference Center
Back to Meet the Get Creative! Experts
|
GetCreativeShow.com
| [email protected]
www.GetCreativeShow.com
Advertisers & Virtual Advantage Web Design Clients |
||
|
SEWING
& QUILTING: A Stitch in Time Quilting Abby's Attic Quilting & Fabric Blossom Quiltworks Buggy Barn Quilts Carriage Country Quilts Charlotte's Sew Natural Cozy Kitten Quilts Deborah Gayle Sales Flamingo Island Designs LLC Fat Quarter Quilters Front Porch Quilts GreatPond Quilts LLC Grandmas Attic Quilting Judy's Barlup's Unique Techniques Karen's Kreations Let's Quilt Liberty Quilt Shop Londa's Sewing LS Boudreau Quilt Fabric Store Mendon Village Muggin's Designer Hats My
Quilt Shoppe
|
SEWING
& QUILTING: Quilting Search Quiltmakers Quilt Shop Quilts by the Bay SAF-T-POCKETS Sewing Gallery Sew Bee It Sew Many Options Tours Silhouette Patterns Stacey's Quilty Conscience Sundrop Textiles Sunflower Quilts Suzanne's Quilt Shop Texas Quiltworks The Quilting Circle The Quilted Crow Tiny Stitches Weather or Not Fabrics VA Quilt Shops Virtual Advantage Quilt Shop Resource VonZensenburg Quilts York Street Quilting Co. CRAFTS
& NEEDLEWORK: |
OTHER
VA CLIENTS: BC Holstein News Cedarland Forest Products Clearbrook Brewing Davit Systems Demo GoldenSilencer.com Silencer Products Int. Heat Safe Industries Kodiak Ranch Lake Tahoe House Rental BC Fishing Resorts BC Fishing Directory BC Fishing Derby Resource BC Sport Fish, BC Sport Fishing Salmon Sports BC Fishing BajaSportFishing Cabo Sportfishing Tide Exchange Beachcombers Marina Kaslo Bay Resort & Condo Dev Mary's Gunns Riverside Golf Highland Powder Skiing Blackfish Marine Blackfish Desert Race Baja 1000 Fairview Electrolysis RealEstateBuySell Silva Panel S'more Camping Please Lighting Store.ca Coast Spas
|